Log in
Register
Forums
Classifieds & Marketplace
Airplanes - All types
Cars, Trucks, and Tanks - All Ad listings
Helicopter & Multi-Rotor - All Ads
Boats - All
Electric Motors
Speed Controllers
Engines - All
Radio Equipment
RCU Rules & FAQs
RCU RULES OF POSTING
RCUniverse.com FAQ
Radios, Batteries, Clubhouse and more
The Clubhouse
Batteries & Chargers
RC Radios, Transmitters, Receivers, Servos, gyros
Control Lines
User Product Reviews
Product Announcements & Manufacturer News
Condor Hobbies
Full Scale planes, cars, helis, boats
RC Humor
Model Rockets & Rocketry
RC Robotics and Autonomous Robots
Toy-Grade RC Products
Unusual R/C
Aerial Photography and Video
Digital Camera & Photo Editing
Digital Video (DV) & Video Editing Software
Off Topic Forum - Planes/Helis
Employment, Jobs, Help Wanted in Radio Control Industry
Free Flight
RC Cars, Buggies, Trucks, Tanks and more
RC Car Videos
RC Car General Discussions
1/16th, 1/18th, Mini & Micro RC Cars
RC Electric Off-Road Trucks, Buggies, Truggies and more
RC Electric On-Road vehicles, race cars and more
RC Monster Trucks
RC Nitro Stadium Trucks
RC On Road Nitro Cars
RC Truggy
RC 1/8th Scale Buggies
RC Giant Scale Cars
RC Classic Cars & Trucks
RC Car Engines
RC Car Radio Equipment
RC Painting, Detailing & Bodies
RC Drag Racing
RC Drifting
RC Rock Crawlers
RC Tanks
CEN Racing
Schumacher Racing
HPI Racing
Academy Racing (MRC) Support Forum
Banzai Hobby Support Forum
Exceed RC Support - Nitro Cars
Himoto Racing Support Forum
Maxamps.com Support Forum
Redcat Racing Support
RC Regional Racers & Bashers
RC Motorcycles
Off Topic Forum - Cars, Trucks, Buggies and more
RCU Member Video Post
Car, Buggy & Truck Photo Gallery
RC Car, Truck & Buggy Reviews
Car, Buggy, Truck Event Calendar
RC Airplanes
RC Universe Online Magazine - Enter Here
Member Airplane Videos
"1/2 A" & "1/8 A" airplanes
3D Flying!
AMA Discussions
ARF or RTF
Aerodynamics
Beginners
Aeroworks Vendor Forum
Austars-Models.com Vendor Forum
RC Combat
Crash & Rebuild
Composites Fabrication And Repair
Events, Shows and Fun Flys - Airplanes
Electrics to Glow Conversions
Extreme Speed Prop Planes
RC Flight Simulator Software
Giant Scale Aircraft - General
Giant Scale Aircraft - 3D & Aerobatic
Global Jet Club Product Supports
IMAC
RC Gliders, Sailplanes and Slope Soaring
RC Jets
Kit Building
M.A.A.C.
Pattern Universe - RC Pattern Flying
Profile and Fun Flying Planes
Pylon Universe - RC Pylon Racing
Questions and Answers
RC Scale Aircraft
Scratch Building, Aircraft Design, 3D/CAD
Seaplanes
S.P.A.D. Aircraft - Coroplast design
Sport Flying
Tips & Techniques
Twin & Multi Engine RC Aircraft
FPV, UAV & Drones
Golden Age, Vintage & Antique RC
RC Warbirds and Warplanes
Aircraft - electric Multi-rotors (Drones)
Drones Talk
Multi-rotor Beginner
Specific Models of Multi-Rotors and Drones
Micro Multi-rotors
Mini Multi-rotors
Aerial Pictures and Video Showcase
Scratchbuilt Multi-rotors
Multi-rotor Electronics
Multi-rotor Power Systems
Multi-Rotor Apps and Related Software
Multi-rotor Events
FPV (First-Person View) RC Aircraft Flying and RC Vehicle Operation.
FPV Talk
FPV Beginners
FPV Equipment
FPV Aircraft
FPV Vehicles
FPV Racing
Commercial UAV/FPV
MultiGP Racing League
Electric Aircraft Universe
Electric General Discussion
3D Electric Flying!
VPP - Variable Pitch Prop 4D flying
Electric Training
Brushed/Brushless motors, speed controls, gear drives
E-Flight Power Sources
Glow to Electric Conversions
Electric Aerobatic & Sport Planes
Electric Pattern Aircraft
Park Flyers & Backyard Flyers
Foamies! - RC Electric Foam Aircraft
Electric Indoor & Micro RC Flight
Electric Pylon Racing
Electric RC Jets
Ask the Expert Sal - Electric Airplane Advice
Electric RC Gliders, Sailplanes and Hotliners
Electric Helicopters
RC Universe Online Magazine
RC Helicopters
RC Helicopter General Discussions
RC Helicopter Beginners Forum
Electric RC Helis
Flybarless Helicopters
AutoGyros
Multi Rotor Helicopters
Scale RC Helicopters
Century - Predator, Hawk IV, Falcon, Raven
Draganfly Innovations Products
Hirobo Support Forum
Kyosho Helicopters
LMH Helicopter
Thunder Tiger - Raptor 30, 50, 60, 90
Exceed RC Support - Helicopter
XHeli.com Support Forum
R/C Helicopter Event Forum
RC Helicopter Heaven Support
RC Helicopter Photo Gallery
RC Helicopter Reviews
RC Boats
RC Boats General Discussion
RC Airboats
RC Sailboats
RC Scale Boating
Speed - Electric
Speed - RC Nitro Boats
Speed - RC Gas Boats
RC Submarines
RC Warship Combat
Off Topic Forum - Boats
RC Boat Photo Gallery
Glow Engines, Gas Engines, Fuel & Mfg Support Forums
Glow Engines
Gas Engines
Everything Diesel
RC Fuels
Tachometer Readings
Engine Conversions
Engine Manufacturers Direct Support Forum
TEAM RCU
TEAM RCU - Info & Bios
Team RCU - Don Szczur
TEAM RCU - Mike McConville
RC Universe Support
Suggestions
MarketPlace questions or problem?
Forum questions or problems
Test Posting Forum
Marketplace
Buy & Sell
Vendor Directory
Become a Vendor
Photo Gallery
New Posts
Premium Membership
Log in
Register
Threads
Threads
Posts
Advanced
Log in
Forgot your Password?
By logging into your account, you agree to our
Terms of Use
and
Privacy Policy
, and to the use of cookies as described therein.
Recent
Popular
Commented
Albums
Trending
My Pictures
My Post Pictures
VincentJ
March 24, 2018
1834
0
Sort:
Most Popular
Default
Most Recent
Most Popular
Trending
Share
Tweet
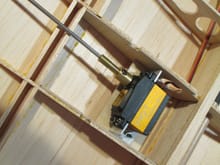
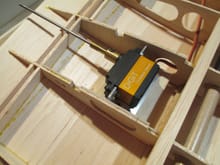
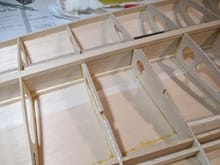
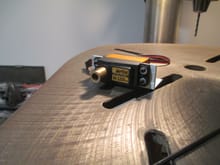
The servo bracket is bolted to the plywood mount which will get epoxied between the rib bays that I reinforced later.
0
2019/09/07 16:55:08
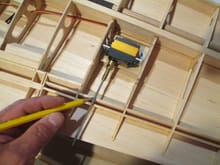
Using a pencil, I'm marking the exit position of the drive shaft.
0
2019/09/07 16:55:07
0
2019/09/07 16:53:36
0
2019/09/07 16:53:36
d
0
2019/09/07 16:53:35
The pencil lines indicate the position.
0
2019/09/07 16:53:35
0
2019/09/07 16:53:31
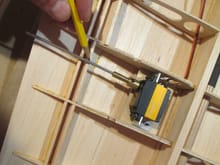
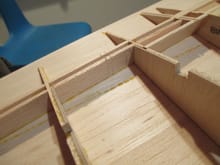
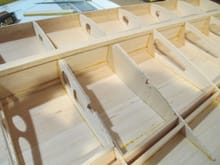
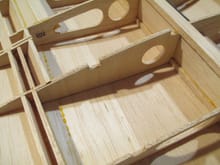
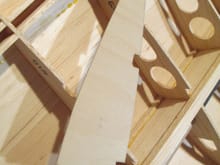
I added two slots at the base of the aileron servo brackets. these will allow the bracket to be adjustable. This may not make any sense yet, but in sort order all will be revealed...
0
2019/09/07 13:14:24
d
0
2019/09/07 13:14:24
d
0
2019/09/07 13:14:24
d
0
2019/09/07 13:14:21
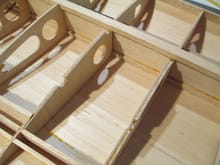
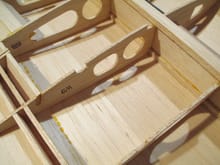
All of the ribs that support the aileron servos have been laminated with plywood are completed.
0
2019/09/07 13:14:19
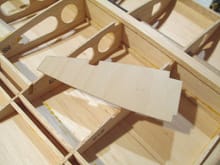
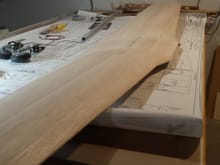
Here is the blank that just needs a bit more work before I glue it into position.
0
2019/09/07 09:13:48
End result is a much sturdier rib that will not flex.
0
2019/09/07 09:13:15
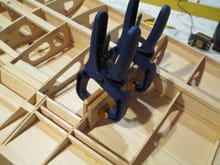
Blank is now glued and clamped into position.
0
2019/09/07 09:13:15
The bay between ribs W-9 and W-10 will support the aileron servo. I want to strengthen these two ribs by laminating 1/16" plywood to their sides.
0
2019/09/07 09:13:07
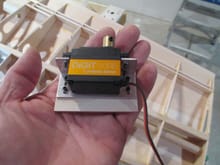
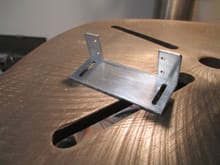
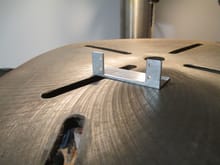
Back view of the bracket. These brackets are super strong, light and easy to make with just some simple hand tools. I will take them to my shop at school later and glass bead them to give them a nice uniform finish later.
0
2019/09/07 09:13:04
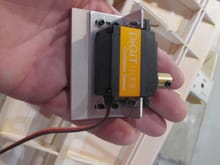
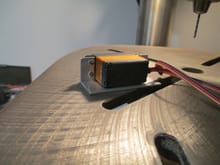
Back view. When making these brackets, always be sure to leave maybe 1/16" clearance between the servo and the bracket to avoid the air-frame's vibration from getting to the servo.
0
2019/09/07 09:13:04
0
2019/09/07 09:13:04
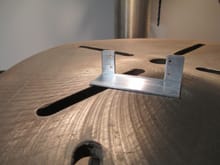
The servo is secured to the bracket using four 2-56 cap head screws and nuts. As I said, these brackets are super strong and I've never had a failure using them in any of my other planes.
0
2019/09/07 09:13:03
Stopped work on the fuselage for now because I have the parts that I was waiting for to complete the wing. I made this custom aluminum aileron bracket that will hold the aileron servo into position.
0
2019/09/07 09:13:03
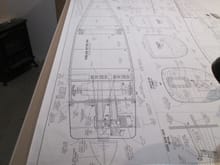
Close-up of center line. The center line is there on the plans, use it!!!
0
2019/09/02 16:09:05
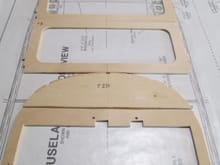
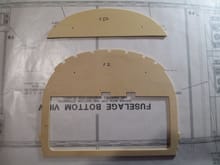
There's a lot of prep work that has to be done before any glue gets spread. I removed all of the die cut plywood Formers from their sheets then I sanded both front and rear surfaces. Next I sanded a 90 degree angle to the bottoms of each Former. The next step is probably the most critical one. I transferred the fuselage center line onto each Former.
0
2019/09/02 16:09:04
Each Former's center line was marked. I can emphasize how important this step is. When placing the Formers into position, I don't need to worry or look at the sides of each Former, as long as the center line is on you wont build a bannana boat!
0
2019/09/02 16:09:04
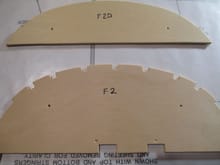
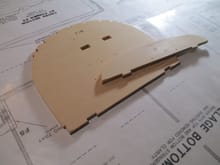
The 1/16" drill bits shown align F2 to F2D correctly. Once the epoxy cures, I will enlarge the holes to 5/16" using my drill press. These holes will allow the wing dowels to align to the fuselage.
0
2019/09/02 12:56:39
The plywood had indentations where I drilled two 1/16" holes that will be used to align both parts before glue-up.
0
2019/09/02 12:56:39
The second former (F2) also requires F2D to also be laminated in front of F2.
0
2019/09/02 12:56:38
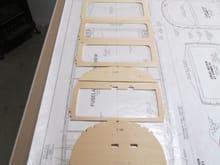
Starting construction of the fuselage requires you to first to laminate two 1/8" plywood formers (F1) together with epoxy. This will ultimately become the firewall.
0
2019/09/02 12:56:36
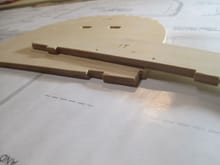
Close-up of the lamination's.
0
2019/09/02 12:56:35
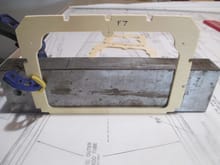
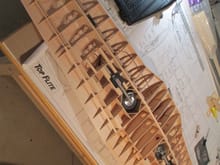
Waiting for some parts for the wing, so in the meantime this is where I store it in my small workshop to prevent it from getting dinged.
0
2019/09/02 07:37:01
While waiting, I cleared off my worktable and decided to start to frame up the fuselage.
0
2019/09/02 07:37:00
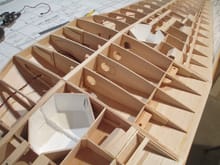
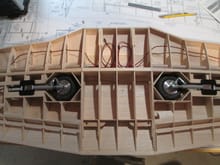
The wheel wells were painted white now as they are exposed, because after the sheeting is attached it would be very difficult to paint. I mixed a small batch of white Klass Kote Epoxy paint which I brushed on.
0
2019/08/31 10:07:26
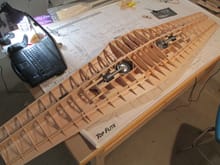
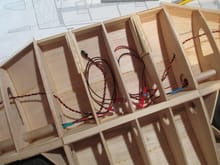
At this point the wiring for the wing is now completed!
0
2019/08/31 03:02:46
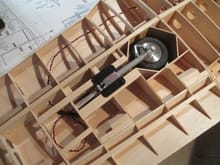
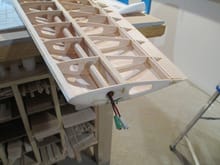
Note were I chose to to run the extension wire for the retract. I deviated from where the wires are shown on the plans. I much prefer to have the wire run in a part of the wing where there isn't a chance for for fraying or for the retract to tug on the wire during operation.
0
2019/08/31 03:02:12
0
2019/08/31 03:02:11
Here are the two wing tips lights for the right side. It was a snap to fish the wires through the existing rocket tube...
0
2019/08/31 03:02:11
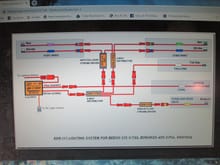
With the retract wiring completed it's time to run the navigational lights for the wing tips. Each wing tip will have two separate lights. One color depending whether left or right along with a white strobe light. Here is the schematic that should clarify things. I think I may have already posted a picture of this schematic earlier...
0
2019/08/31 03:02:11
Close-up of were all the wires terminate. I will not drill any exit holes at this point. I will tend to that task after the wing is sheeted, glassed and painted. Doing it this way the wires wont get in the way and they won't get painted.
0
2019/08/31 03:02:09
Retract extension wires (purchased separately from Robart) were run in place.
0
2019/08/31 03:02:07
Wing is now one piece!
0
2019/08/30 17:55:26
First
Page
12 of 46
Last
Go To
Page
1
...
10
11
12
13
14
...
46
12 of 46
Go To
GO
Go to page
of 46
pages
1
...
10
11
12
13
14
...
46
Copyright © 2024 MH Sub I, LLC dba Internet Brands. All rights reserved. Use of this site indicates your consent to the Terms of Use.